Project #7
ATLAS
Arduino Trip-Wire Laser Alarm System
ATLAS is a laser-based security system designed using an Arduino microcontroller. A 5V laser is aligned with a photoresistor across a path where an obstacle is expected to cross. When the beam is broken by an obstruction a buzzer is triggered and an LED flashes. The screen changes to indicate an intruder detected and a servo motor activates to imitate a door locked
Technical Breakdown
Components Used:
1. Arduino UNO Board
2. 5V Red Laser
3. Photoresistor
4. IR Remote
5. TSOP IR Receiver
6. SG90 Servo Motor
7. ST7735 1.8" TFT LCD Screen
8. LEDs x3
9. 220kΩ Resistors x 3
10. 10kΩ Resistor
Key Features
1. Laser Tripwire Detection
A laser beam is aligned and constantly shines on a photoresistor. Any interruption (like a person walking through) causes a sharp change in light resistance, triggering the alarm system. The precision of this setup makes it highly reliable for detecting physical movement.
2. Multi-State System
The code allows for Atlas to be a finite state machine meaning it always operates in one of three states: normal, intrusion, and override. This allows you to toggle system behavior using an IR remote, using more appropriate, optimized logic beyond simple if statements.
3. Audio-Visual Alerts
When triggered, the system produces both visual (blinking LED, display message) and audio (buzzer beeping at intervals) alerts. These outputs make it much easier to identify the source of the intrusion when it happens and serve as a sort of a backup in case one form of notice fails.
4. Remote Controlled Override
Using the IR remote, you can switch the system to an override mode where it stops reacting to the laser being broken. This is great for when you would like to observe the system but not be disctracted by the constant intruder alarms when the beam is unintentionally broken
5. LCD Status Display
The LCD screen provides real-time updates like “INTRUDER DETECTED,” “SYSTEM READY,” and “OVERRIDE,” meaning that with one glance at the screen it is rather easy to tell what is going on in the system.
Demonstration Video
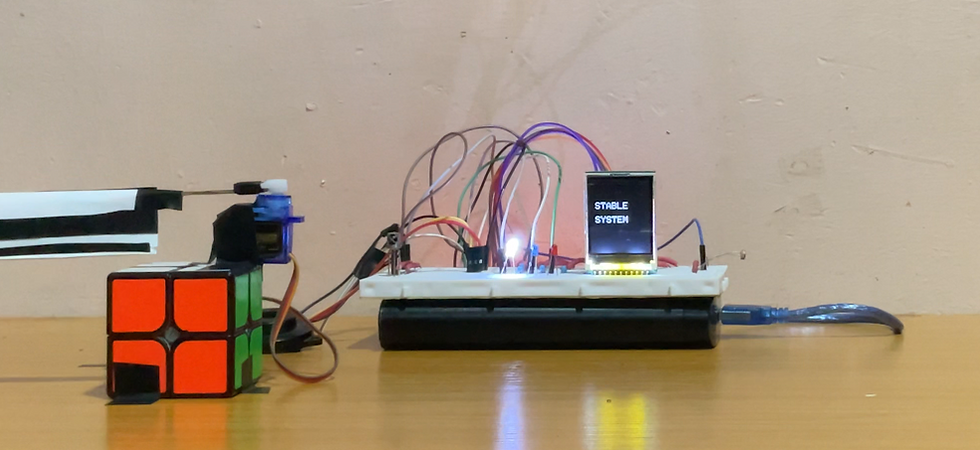
In the demo I power ATLAS and the system launches in the stable state, shown by 'Stable System' on the screen. The laser is calibrated to align with the photoresistor so this is normal. I later introduce an obstruction to the beam, Tom from the hit series Tom & Jerry (did you watch it?), and the beam is broken.
The system enters the astable state shown by 'Intruder Detected' on the LCD screen. The light also changes to the flashing red and the blinking red LED helps in sounding the alarm. The servo also closes to imitate a gate closing automatically upon detection fo an intruder.
I use the IR Remote to move the system into 'override mode' meaning that breakages to the laser-resistor beam are no longer responded to. This basically freezes the system. The blue LED comes on and the screen shows the new state.
Finally I return the systemt to normal by turning off the override and as we can see the system returns to the normal detection of obstacles.
Demonstrating the Real-time Obstacle Detection Capabilities of ATLAS
Notes
ATLAS is the first Arduino project I’ve built entirely in school.
Every other project before this one had been done at home, where I had the luxury of time and quiet to work at my own pace. But with Atlas, everything from testing individual modules to writing and debugging the code happened in my dorm room, often while answering questions from curious coursemates who’d walk in and ask what I was building. After enough peope and enough questions I straight up started saying I was building a bomb, that always got a laugh. It was a fun shift. I found myself needing to troubleshoot efficiently, if only to avoid looking confused in front of others while staring too long at the breadboard. That environment added some good pressure.
One area I noticeably improved in was my wiring technique.
For the first time, I took the initiative to cut and customize wire lengths for short connections like LED ground lines and power rails for the servo. This made the entire setup look a lot neater and helped me better organize my thinking around the physical circuit layout. Even though the circuit might still look a bit disjointed in some areas, this attention to detail was a step forward from my earlier, more tangled prototypes.
On the code side, handling the logic states was a breakthrough.
Instead of writing everything directly in the loop, I structured the code into three main states; normal, intrusion, and override, each with its own function. This made the code far more readable and easier to debug. Segmenting the logic like this gave me more control and flexibility, and made it easier to test behavior one state at a time without getting lost in long blocks of conditional statements.
I also hit my first timer conflict error.
At first, I couldn’t understand why the code wouldn’t compile. It turned out the IRremote library and Arduino’s built-in tone() function were both trying to use the same timer (Timer2), which led to a multiple definition error on interrupt vector 7. That was the first time I’d encountered a conflict like that, and solving it was both frustrating and satisfying. I ended up writing a custom tone function (myTone) to simulate the buzzer behavior without using the conflicting timer, and that fixed the issue.
The override feature wasn’t originally part of the plan.
It was actually suggested by my roommate, who’s also studying electrical and electronics engineering. He was helpful throughout the final phase, especially during the early morning filming of the demo. That was another first; recording a project video at 5 a.m., complete with the cawing of hostel crows in the background. The filming was a learning curve of its own, but it added to the experience.
Looking back, I think I’m most proud of the name I gave it.
I started out with the idea of calling it TripGuard, which wasn’t bad, it was straightforward and descriptive. But while I was staring at the finished circuit board, the name ATLAS came to mind: Arduino Tripwire Laser Alarm System. It stuck immediately. That name gave the whole project more identity and presence. It’s a small thing, but naming something well gives it more life. I’m glad I took a moment to think about it.
Check out my other projects here!