
Project #2
the LED Knight Rider
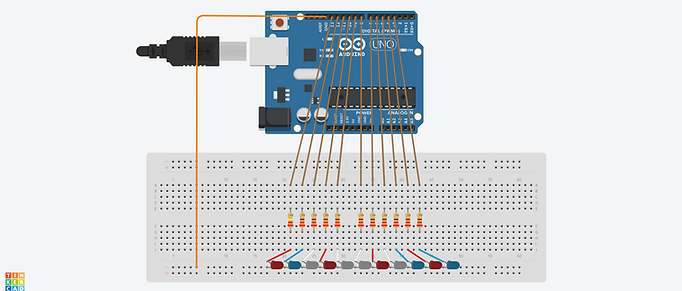
The LED Knight Rider is a simple stunning visual setup. It consists of eleven 5mm two-terminal LEDs arranged linearly. The lights were made to fade in; gradually increasing in brightness, bounce individually and bounce in pairs.
Technical Breakdown
Components Used:
1. Arduino UNO Board x1
2. 3mm LEDs (Red, Blue and White) x11
3. 220kΩ Resistors x 10
4. 1kΩ Resistor x1
5. Jumper wires
Key Features
1. Wave Effect
-
The first pattern gradually fades in each LED in sequence, creating a smooth wave effect across the row.
-
The brightness of each LED is controlled using Pulse Width Modulation (PWM) through analogWrite(), and the fade direction reverses once the brightness reaches its limits (0 or 255).
-
This creates a continuous in-and-out fade effect, providing a visually appealing transition🤓
2. Bouncing Pattern
-
The second pattern mimics a "bouncing" effect, where each LED turns on one after the other from left to right, then reverses direction from right to left.
-
This creates a back-and-forth bouncing motion across the LEDs, simulating movement along the row.
3. Double Bounce Pattern
-
In this pattern, two LEDs light up simultaneously, starting from the outermost ends and moving toward the center.
-
Once they meet at the center, the sequence reverses, creating a mirrored bouncing effect.
-
This pattern adds complexity and symmetry to the display, enhancing the visual appeal.
4. Adjustable Speed and Brightness
-
The speed of the LED transitions can be controlled by adjusting the delayTime variable in the code, allowing for faster or slower animations.
-
The brightness of each LED is dynamically adjusted, and the fading effect is controlled by fadeAmount, which can be easily modified to increase or decrease the smoothness of the wave.
Demonstration Video
Demonstrating the LED Knight Rider's dazzling visual displays
Notes
Although this project may seem simple, it came with its fair share of challenges. One unexpected hurdle involved the jumper cables from my electronics kit. After detaching them from the original set, they stopped working after just a day or two. Initially, I assumed my components were faulty, which led to quite a bit of troubleshooting. It wasn’t until about a week later that I realized the issue was with the cables themselves. I began testing each cable using a basic blinking LED program—which, funnily enough, sparked the idea for this project.
Another minor limitation I faced was the shortage of 220Ω resistors in the kit; it came with only 10. As a workaround, I used 1kΩ resistors for the LEDs, which, though unconventional, got the job done without any issues.
While this project is quite elementary, I wanted to start small as I familiarized myself with my new Arduino kit. This LED Knight Rider effect was a fun and manageable way to kick off my journey into more complex projects.
Be sure to check out my other projects here.